CNC in the (Model Engineers’) Workshop

Part 5

The fifth instalment of CNC In The (Model Engineers’) Workshop was published in the Autumn 2013 issue (no. 207) of Model Engineers’ Workshop, arriving at UK subscribers on 1st September 2013.
In this issue we continue with the construction of the vice plate.
MEW Issue 207 : Autumn 2013
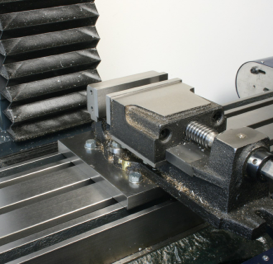
The Workholding Challenge
While the Vice Plate project doesn’t illustrate mass production using the full power of CNC, it does illustrate a couple of important points.
Firstly, speed and efficiency of setup is important.
If we can’t get set up in a reasonable time, enthusiasm wanes, I find. The vice is an ideal way of gripping many pieces of work, so it is worth adding a plate or a tongue to allow the vice to be set on the bed and lines up with the fixed jaw parallel to the X or Y axis with ease.
Secondly, although all we are doing in creating the plate is milling four sides of a square, the problems caused by the plate being awkwardly large are not trivial. They are an example of a very common situation where it is difficult to get the work set up so that we can get a clear run at machining the part. Frankly, it’s a pain.
Sure; if the workpiece was smaller we would be able to zip around the four edges without moving it. Or would we? What about the clamps, I hear you say?. Yes; very true; and another universal problem. The solution lies partly in having enough experience of previous setups to be able to spot a solution. If the material was a little smaller, I would suggest drilling the holes first then using those holes to bolt the work to a packing piece and to the table, using four tee nuts in the mill slots.
But of course the material is inconveniently large.
I sometimes think I should machine smaller things; make smaller models and other things, and be content with the little things in life.
But then again; where would be the challenge?
You now know...
what I already knew; that I can’t tell my right from my left.
I always check my references to right and left quite carefully, but even that, as I have discovered, is no guarantee I won’t make a mistake.
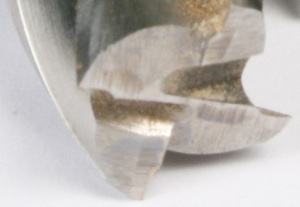
On page 18, third column, about half way down, in the third paragraph, I say “To cut directly down into a workpiece, and end mill needs at least one over-centre tooth like the right-hand cutter in photo 42...” I meant “like the LEFT-HAND cutter in photo 42” but I’m sure you guessed that.
As a special consolation for those of you who were unconsolably perplexed, here’s a close up of the end of that cutter:
Laborious typing
We are headed towards Teach sequences and construction of programmes, both of which will cut down on the typing. In the meantime, I would encourage you to take all the shortcuts you know, like copying and pasting, to cut down the typing.
Mind you; there is some merit in having to think about what you will type next, because it forces you to think about where the CP must move, and that is always a good thing.
Foothills
We are in a slow patch, but we will make progress shortly.
My purpose is to take you through all that I think is necessary, for you to be able to use your CNC machine effectively. Part of that, though, involves things other than diving into programming.
I am aware, too, that not all readers are beginners, so I hope there is something for you even if you are an expert.
Download the article here